Related sites:
Newsletter: Perspectives on Power Platform
Company: Niiranen Advisory Oy

This is the first part in an article series where I’ll be presenting a few customization tips & tricks that you can use in Microsoft Dynamics CRM 2015 to enhance the functionality used in a typical sales process. The content was first shown in my live webcast on MSDynamicsWorld.com on May 6th: “A Non-Developer’s Guide to Smarter Sales Processes in Microsoft Dynamics CRM 2015.” As promised during the webcast, I’ll be releasing all the slides here on my blog, but since there was a lot of details to go through in the 1h session, it will be split into three separate articles, to improve the accessibility to this information for those who didn’t attend the live webcast.
The overarching theme of this series is to show you how the creative combination of the various customization tools available in Dynamics CRM 2015 can be used for building whole new functionality into the application – without having to write any custom code. The emphasis is on the word combination, since very often you’ll need to use several different pieces of the platform’s customization tools to achieve the end result. This isn’t something that you can easily learn just by reading the official product documentation that typically focuses on the introduction of a single feature at a time. With the examples in this article series I hope to demonstrate what these combinations could look like, in the context of customizing the standard application behavior in the sales process.
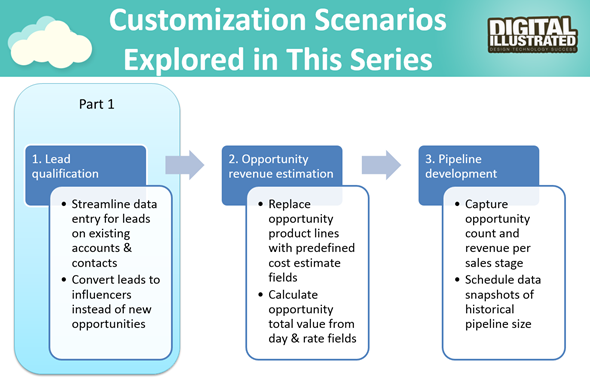
The techniques are by no means exclusive to the sales area of Dynamics CRM. Any process that you manage with our CRM/XRM application can surely benefit from the type of custom functionality that you can build via Business Process Flows, Real-time Workflows, Business Rules, Calculated Fields and Rollup Fields. The absolutely best way to gain an understanding of what you can achieve with the point & click customization tools in Dynamics CRM is to experiment with the tools in a sandbox environment, so I encourage you to go and try out these scenarios in an actual working CRM system. (Why not spin up a new CRM Online trial org and also get access to all the new CRM Online 2015 Update 1 goodies while at it?)
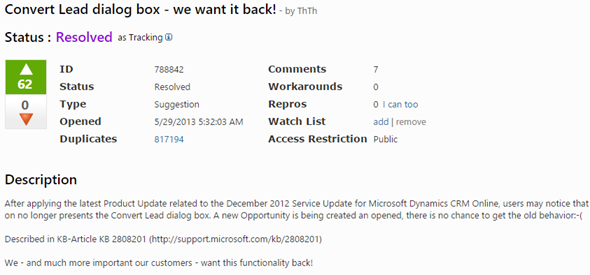
Those of you that have been working with Dynamics CRM for more than just a couple of years will probably remember how the things used to work before CRM 2013. When clicking on the Qualify button on a lead record, the user was presented with a dialog that allowed them to choose whether a new account, contact and opportunity record should be created from this lead. In the new world of Business Process Flows and no-popup UI of CRM 2013 (and CRM 2015), such options are no longer presented to the user. While this makes for a smooth user experience in general, it creates severe conflicts with many real life business processes of companies who either A) don’t use opportunities or B) don’t want to directly convert each lead into an opportunity. There are lots of suggestions on MS Connect (registration required, see here) to restore the ability for users to select not to create an opportunity from a qualified lead, but so far we haven’t seen any changes in the product to accommodate this.
So, if CRM wants to create opportunities but the user doesn’t, what could a mere system customizer do, without any knowledge of how to write plugins or scripts to develop new functionality by using the CRM SDK? Well, I’ve come up with a reasonably good workaround that uses the following solution components to establish a true user driven lead qualification process:
You can find the detailed description of how I’ve configured each components from the below presentation:
(For those of you who are not reading this article directly on survivingcrm.com and can’t see the embedded SlideShare presentation, click this link to access it.)
I hope that this example has given you some ideas on how the lead management process and related Dynamics CRM functionality could be further developed in your own CRM organization. Stay tuned for part two of this Smarter Sales Process series, where we’ll be moving to the opportunity record and exploring how the estimated revenue information can more easily be managed by using the Calculated Fields feature introduced in Microsoft Dynamics CRM 2015 release. If you simply can’t wait for it or want to see the lead qualification process in action, then the webcast recording is available on YouTube already today.

great knowledge share , we just have to see if this tips can work with older version of CRM
[…] time for part 2 in the Smarter Sales Process article trilogy. As described in my previous blog post about lead qualification process customization, this content is taken from my MSDynamicsWorld.com webcast titled “A Non-Developer’s Guide […]
I jumped the gun and qualified a Lead into an Opportunity too soon. Can an Opportunity be reverted back into a Lead in CRM 2015?
Bill, you should be able to reactivate the qualified lead record + delete the unwanted opportunity, depending on your security roles, of course.
How do I reactivate the qualified lead if it is already converted into an opportunity?
Jukka, I just figured it out. Thank you for your help.
I am running into issues with some Opportunities where I cannot Reactivate a Lead from an Opportunity. It just doesn’t even give me the option.
hi – this was a great session. I have a problem though. I can create an new account and contact record from a lead using a workflow, but don’t know how to update the primary contact of the account with the new contact record… am sure it is something basic i am missing
Geoff, you would need to add one more step after the contact creation to achieve this, which would essentially be an update step for the account record. Every workflow step can refer to the records created in the previous steps, but in the workflow editor they’ll be identified by the description give to the step (the optional text shown in bold above the actual workflow step logic).
For example, on slide 18 the last step in the workflow reads as “Update: Create new contact (Contact)”, in which the “Create new contact” part is the description of a previous workflow step and “(Contact)” just signifies the type of entity. So, if you’d want to add a further update step that would set the Primary Contact field of the parent account, then you’d need to add a step like “Update: Create new account (Account)”.
Now, since the we always have to take into consideration both scenarios of either updating an existing account/contact or a new record created as a part of the same workflow, you may need to repeat the Update step under different conditional branches of the workflow logic. However, if you only want to apply the primary contact assignment for a scenario where both the account and lead are created from the lead, then you should be fine with just adding one last step into the workflow, after the last “Set contact parent account” step.
many thanks Jukka – that is very helpful. have sorted it out. 🙂
When a lead is qualified via the UI, all child activities on that lead are set regarding to the new contact. I cannot find a method in the SDK that does this. Most activities can be reassigned with workflows except for “Notes”. Do you have any other ideas on how to do this, or am I writing yet another custom workflow to get out-of-the-box functionality?