Related sites:
Newsletter: Perspectives on Power Platform
Company: Niiranen Advisory Oy
Using the command designer in Model-driven Power Apps to add new buttons for activity tables, to perform common status change actions. Exploring how the modern commanding features and Power FX formulas can be used in scenarios that previously required Ribbon Workbench and JavaScript.
The preview feature for customizing command bars in Model-driven Power Apps is one of the most exciting examples of how the converging app types allow doing more with less code. Instead of having to learn how to write JavaScript, the low-code app maker can now leverage the Power Fx language familiar from Canvas apps development (and of course Excel formulas) to add custom business logic for command bar buttons.
This preview was launched late July, but up until now I hadn’t come across a need to use it in an actual Power App. Today I encountered a familiar platform limitation that I though would be a great opportunity to try the new Power Fx based commanding in practice.
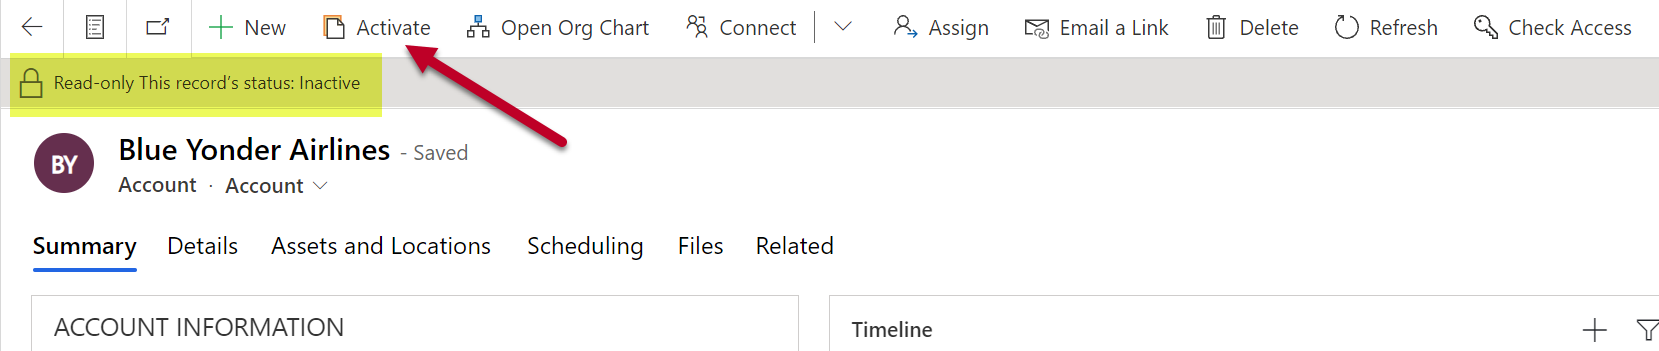
The scenario is this: for any “normal” table in Dataverse, there’s usually the possibility for the user to change the status not just from active to inactive but also from inactive back to active. For example, re-activating an inactive account is a feature available natively in the command bar:
The story is different when working with activity tables. Let’s say we have a task record that we’ve closed as completed but would want to append with further information. Hmm, where’s the “activate” button on this form’s command bar…?

It’s not there. Activities like tasks, phone calls, appointments aren’t something you can easily reopen. This has been the situation for as long as we’ve had Dataverse / Common Data Service / XRM / Dynamics 365 / Dynamics CRM. It’s not that the user wouldn’t technically be allowed to perform the reactivation. There just isn’t a feature that would allow you to click on a button and start editing an activity that has already been closed.
The traditional no-code way for making this available to the user would have been to create an on-demand XRM workflow for them to run. A more advanced option would have been to create a JavaScript web resource and use the Ribbon Workbench to add a custom button for the user to click on.
Yeah, the Ribbon was cool in 2011, but let’s see if we would have a better way to achieve this with Power Apps functionality now in the year 2021.
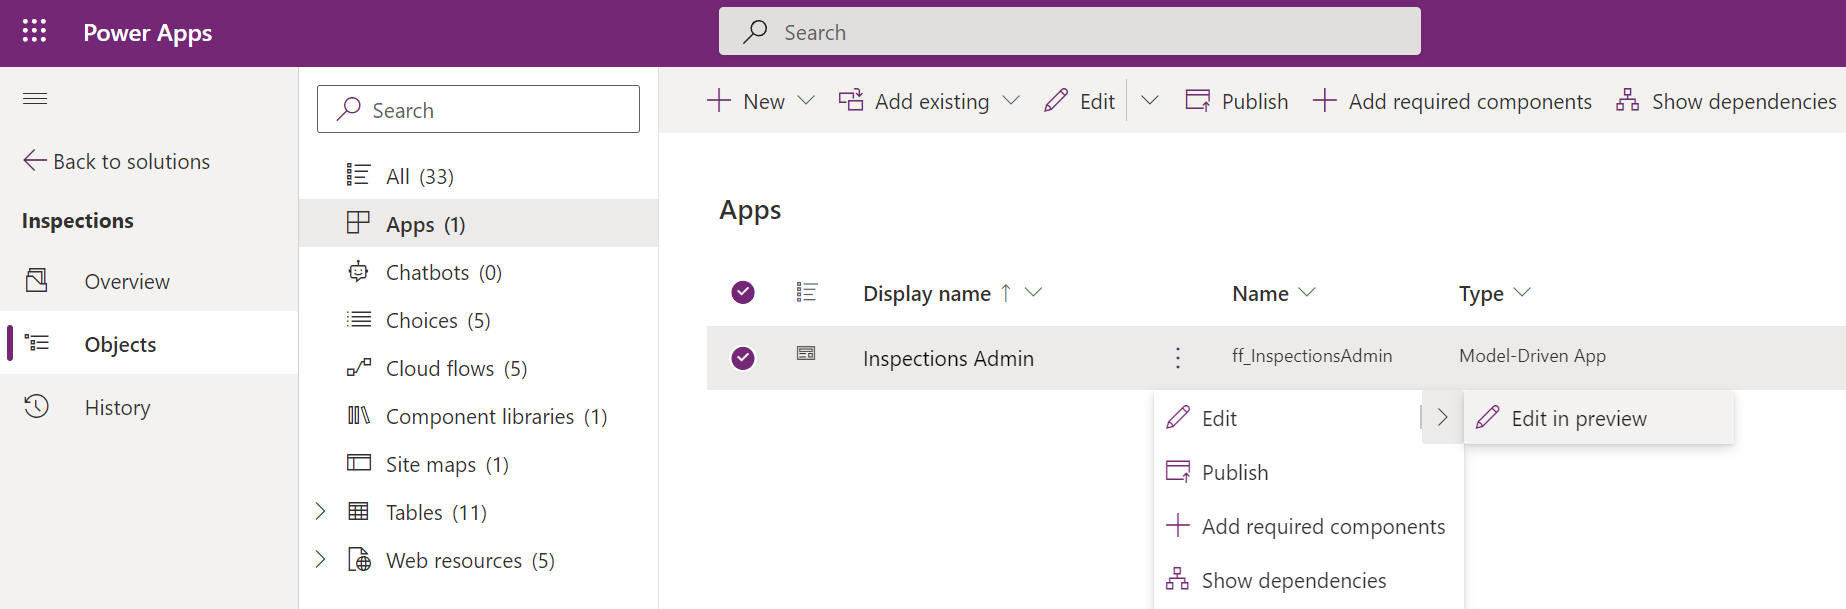
The first thing we need to do is to locate the new command designer. Currently this lives inside another preview feature, the modern app designer. We can launch this designer when looking at the options for editing a Model-driven app module inside a solution:
In this new world the command bar is a component found from under a page in the app module. So, let’s look at the page for the task table and choose “edit command bar”:
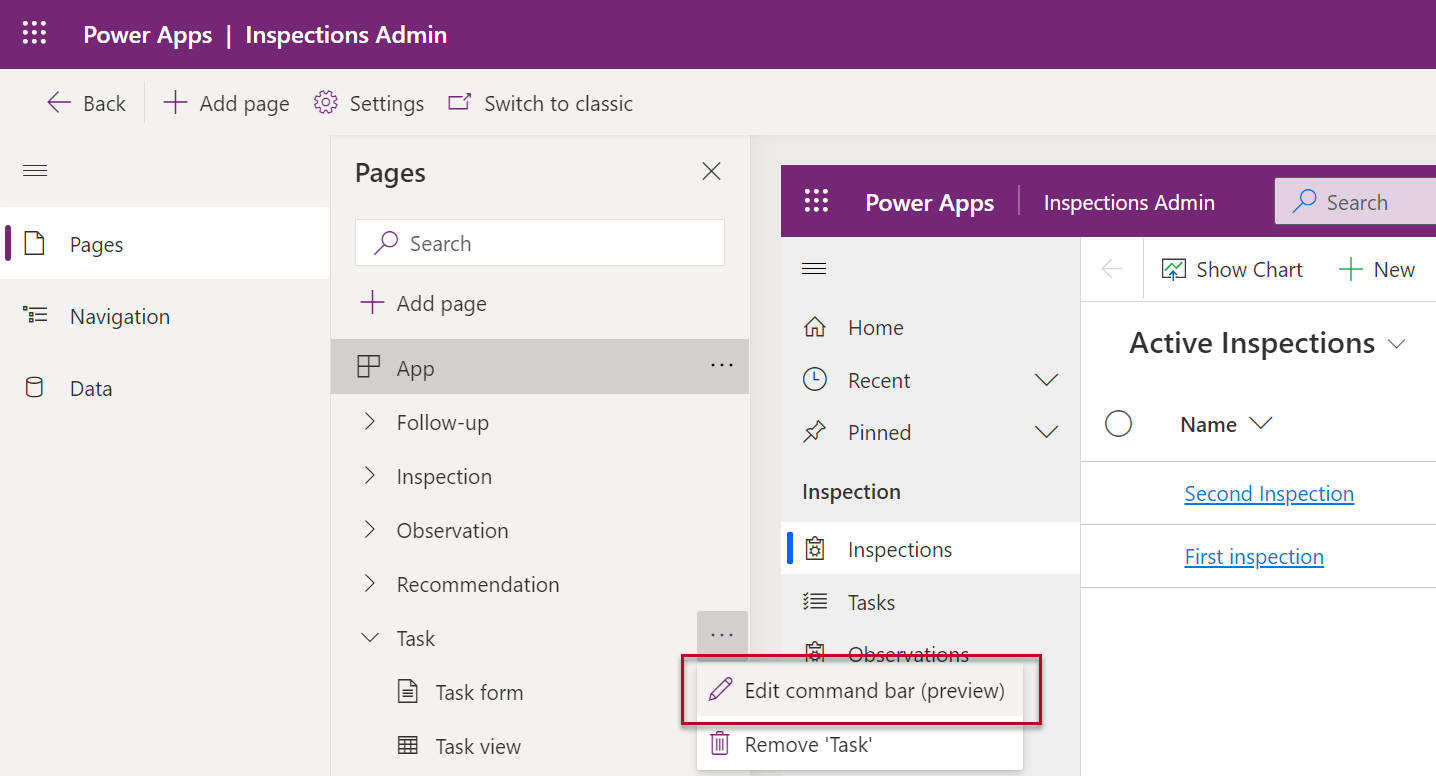
We need to keep in mind that we’ve got 4 different command bar locations to choose from. All of them are potentially relevant for such a generic feature, but to keep things simple we’ll focus on the main form command bar. This means that when we open a task record into a full window (or Main Form Dialog modal window), we want to see our new custom button there. It’s better to start from a command specific to a single record rather than any of the views where a command might need to apply to a number of different records from the same table at once.
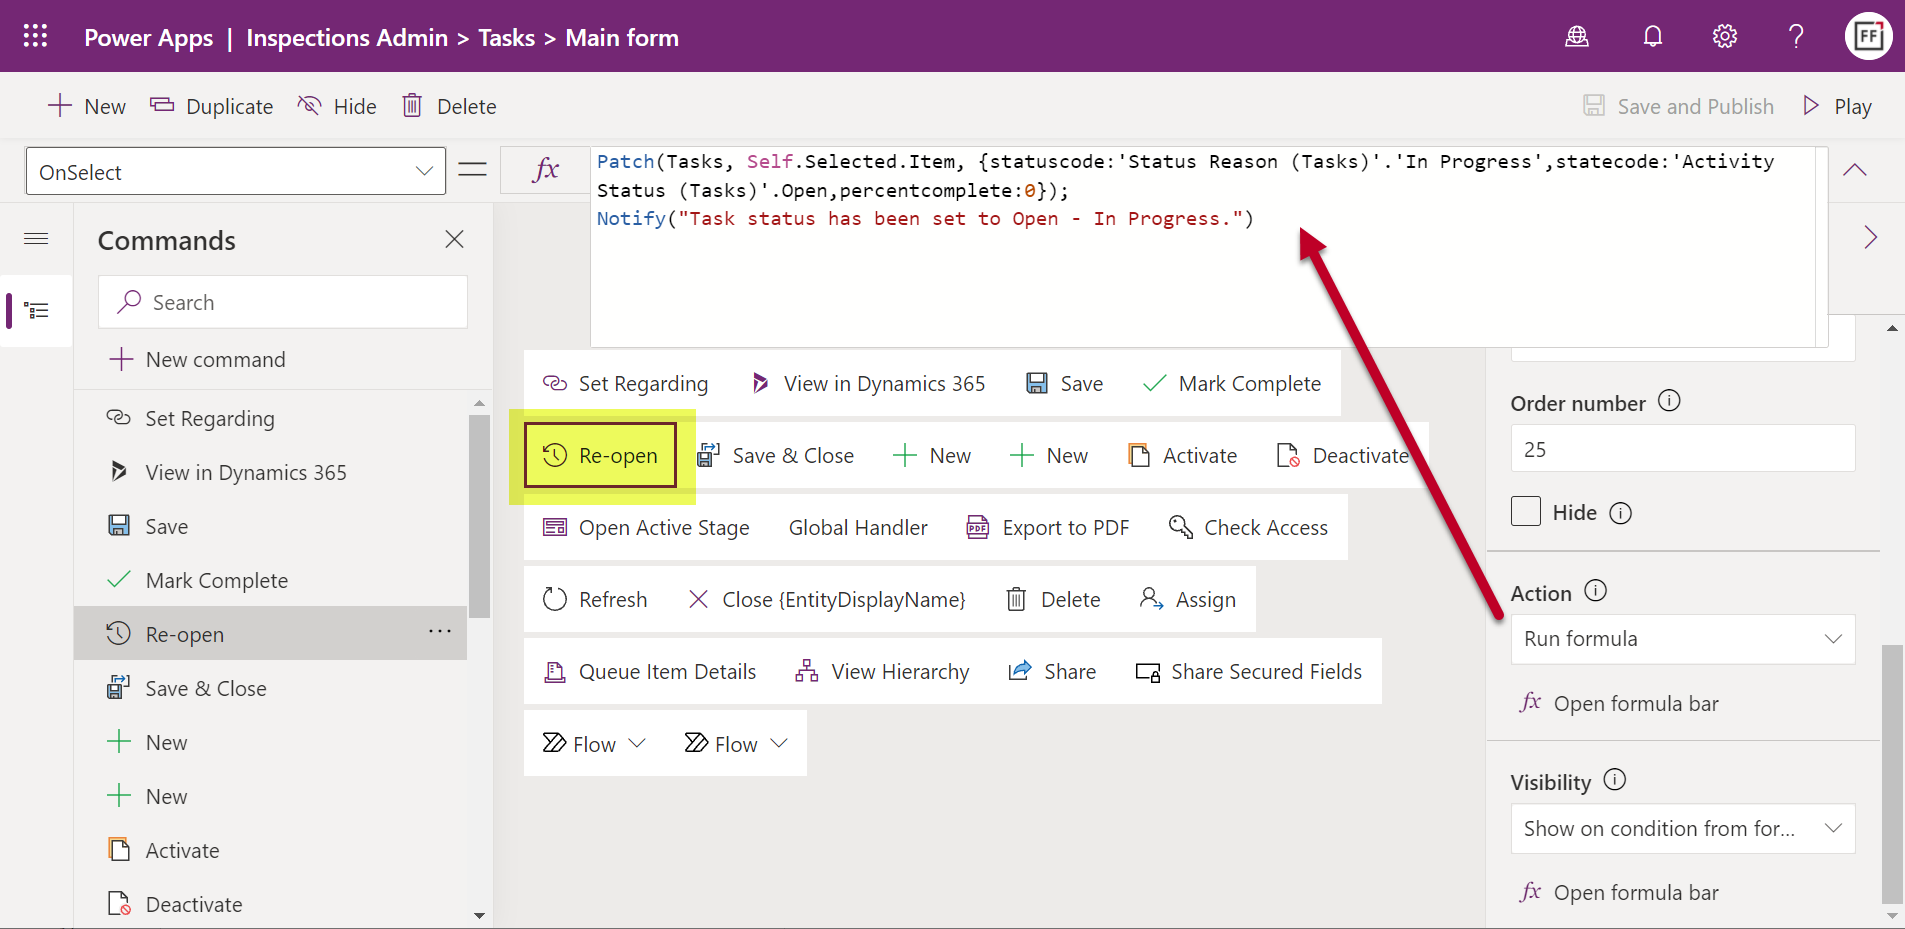
In the command designer window we can add a new custom button. The simple no-code parts are the visual editing experience of giving the button a label, icon, tooltip and dragging it into the suitable relative position in the existing command bar for the task table. Once we get to the low-code part of writing the Power Fx formula to perform an action for this button, it’s a good idea to pause for a moment and think about what elements we need to work with.
First of all, what we want to do is to update the current record (rather than creating a new one). We need to use the Power Fx Patch function to accomplish this. The documentation gives us an idea of how to set the target object (Self.Selected.Items), but when it comes to the actual fields to be updated, we’re going to need to do some research on how activity tables in Dataverse behave.
An important detail to understand is that the record status isn’t something that you just set with a single field value. It’s a combination of the Activity Status (statecode) and Status Reason (statuscode) that need to be aligned in order for the status change to go through succesfully on Dataverse side. A combination of Power Apps Community posts and the Dynamics 365 Customer Engagement developer docs for the task EntityType is needed here to figure out what values your Power Fx formula should use. The end result is:
Patch(Tasks, Self.Selected.Item, {statuscode:'Status Reason (Tasks)'.'In Progress',statecode:'Activity Status (Tasks)'.Open,percentcomplete:0})Due to the funny data types for choice columns in Dataverse (formerly option sets in CDS / XRM), we need to reference the available values for a specific choice, as seen above. Now, this gets us to the question of “how do I make sure my command bar formula is correct?”
Unlike with the traditional Canvas app Maker studio, you can’t easily run the formula on a test record and see whether you get an error or success. Which is why I very quickly proceeded to creating a dummy Canvas app to validate my Power Fx formula against a real record in Dataverse to see the results in action. I’d recommend you do the same for any custom command formula that you’re not 100% sure to work when added as an action onto a button.

OK, looks like we’ve got the status change part nailed down. But what’s with that “percentcomplete” value in the formula? It has to do with how we control the button visibility later on.
While we can get the job done by just adding a button that will perform the action missing from default Power Apps / Dynamics 365 activity forms, we should also pay a little more attention to the user experience. In this scenario, the action for reopening a task isn’t going to be relevant for any task record that has not yet been closed. To make sure we don’t create unnecessary clutter in the UI, let’s hide our custom command from records that are not valid targets for its action.
In theory we should be able to accomplish this by adding a visibility formula for our custom command that reads:
Self.Selected.Item.'Activity Status' = 'Activity Status (Tasks)'.CompletedThis should be true only when the task record we’re looking at has been closed as completed. Yet it doesn’t work. Even though Mr. Ribbon Workbench himself, Scott Durow, uses this structure in his example of a “set visibility” expression, it didn’t produce the desired results in my app.
How about the Microsoft docs then? Well, they claim that the formula to control visibility based on record data should be something like this:
//Button will be visible for accounts with Account Rating > 20
Self.ThisContext.SelectedItem.'Account Rating'>20
Unfortunately “Self.ThisContext” isn’t something that the intellisense feature in the command designer editor recognizes at all, so we’re kinda stuck here. Unless we can figure out a way to identify the closed status of an activity record without referencing those pesky choice fields.
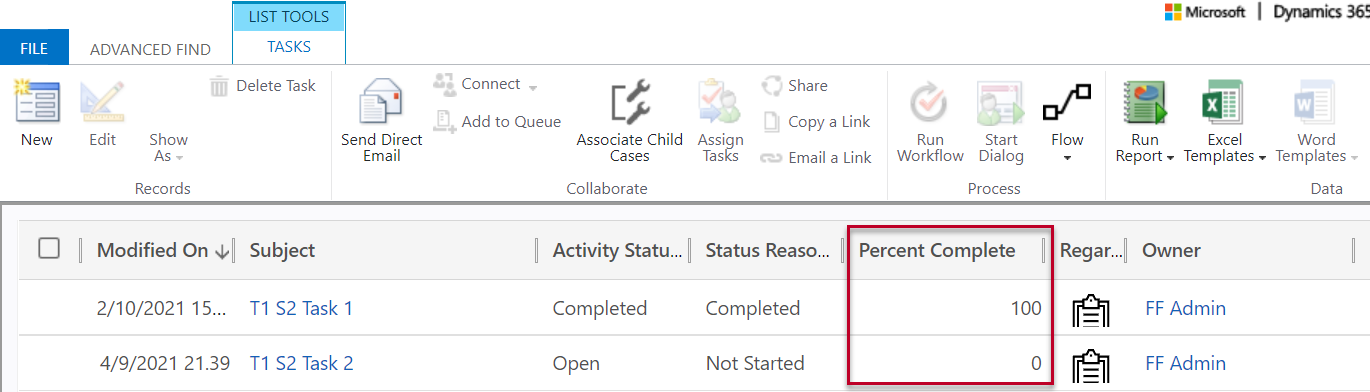
Let’s do what an experienced XRM customizer would try and launch Advanced Find to explore all the column values in our task table rows to look for clues. A-ha! There we have it! The system apparently populates the Percent Complete (percentcomplete) integer field with the value 100 whenever the task status is changed to completed:
Let’s use this information to design an alternative formula for our custom command’s visible property:

Self.Selected.Item.'Percent Complete' = 100Now we only see the “Re-open” button on task forms where the record is in completed status. We should make sure that upon reopening the task we also set his value back to less than 100, which is what we’ve already got in our action formula.
We now have functionality in place for both the action we want to perform and when we want it to be visible in the command bar. To add more polish into the user experience, we could take advantage of the confirm function and show the user an “OK / Cancel” confirmation dialog box before the action to reopen the task is performed.
The only problem is: it doesn’t work. Once again, the intellisense feature for the Power Fx formula refuses to acknowledge that “Confirm” would be a valid function. Saving it into our action formula will not produce any visible results. OK, we need to keep in mind that modern commanding is still in preview, so let’s give Microsoft some time to fix these issues before using them in our production apps.
Thankfully the notify function does work with custom commands already today. We can add this line into the action property of our button:
Notify("Task status has been set to Open - In Progress.")When the user then goes and clicks on the button for a completed task, the experience will be the following:
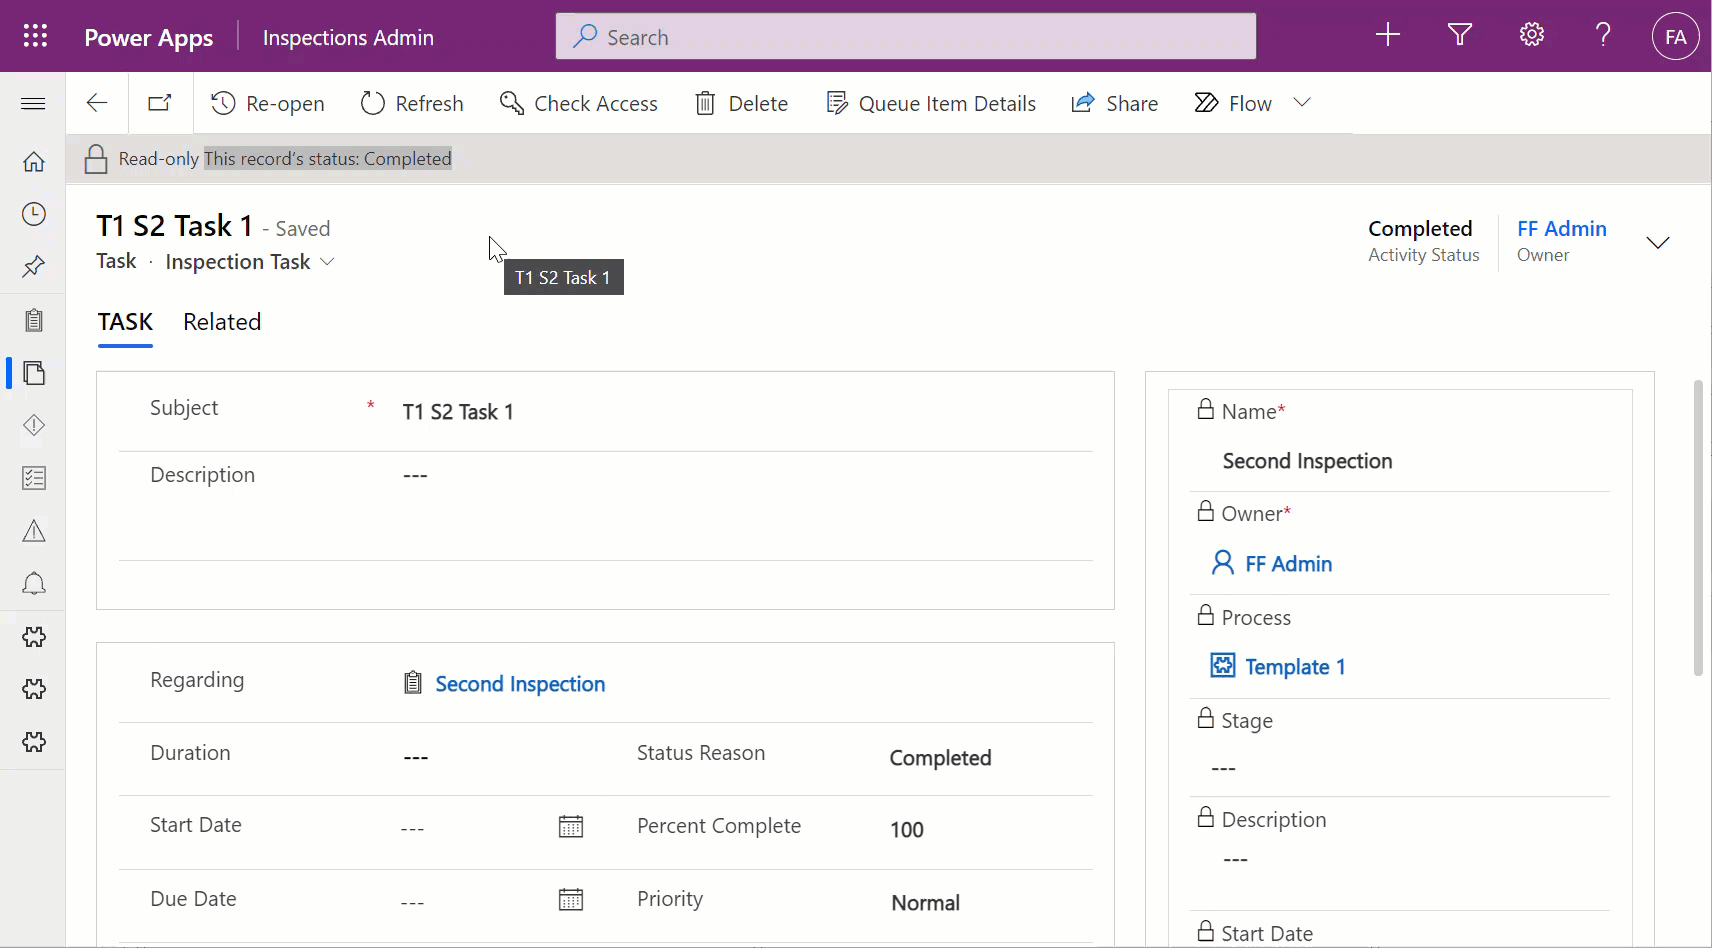
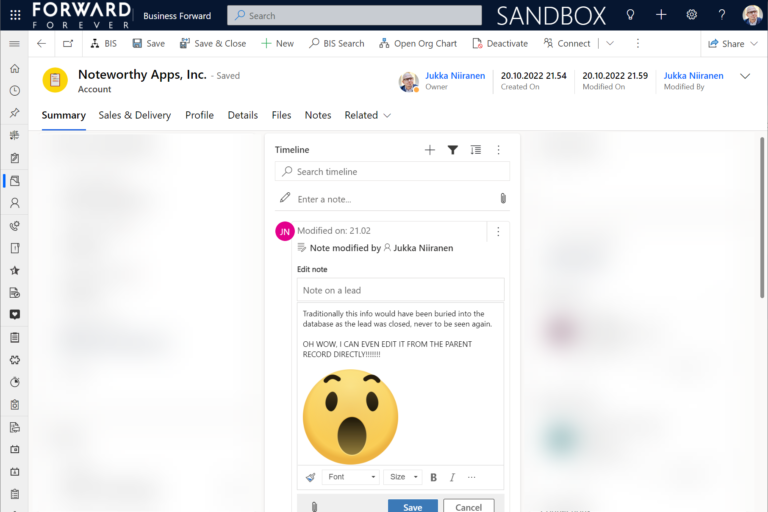
Showing the custom notification bar in the same location as where the default system message “Read-only – This record’s status: Completed” would normally be is actually a pretty nice experience. The user probably can’t distinguish this from a native command behaviour.
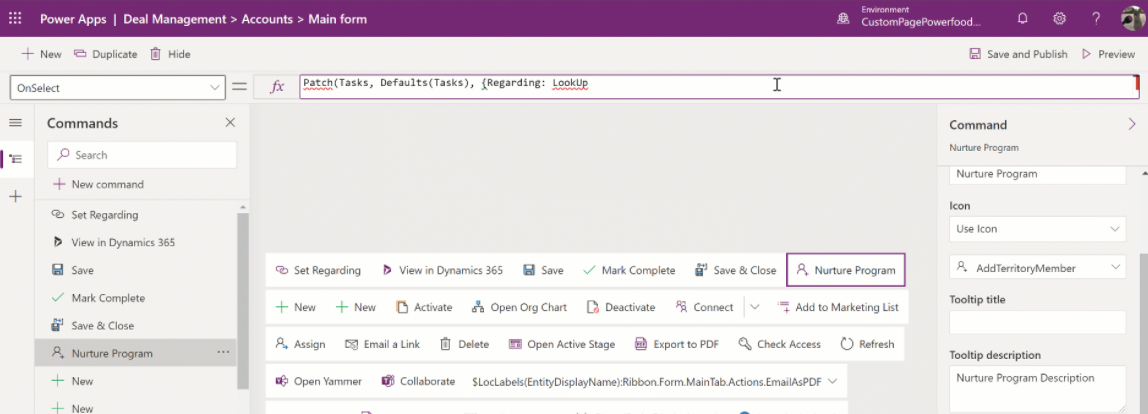
With similar steps we are able to also make commands available outside the single record form. Now, the big difference here will be that instead of always being sure we have exactly one record to work with when on a form, grids provide users the opportunity for multi-select. Which can be a bit of a problem, since at least based on the current preview documentation for modern commanding in Model-driven Power Apps, I don’t know how the Power Fx formulas should be structured to loop through a record set.
Let’s therefore build something that we know will work, based on the above example. On our custom table “inspection” we have a subgrid of tasks related to that parent record. To streamline the process of marking the tasks completed, we can add a button on the subgrid command bar that allows us to change the status without leaving the main inspection form. Here’s what it will look like:

I’ve added a “Complete” button to the subgrid view commands for the task table. The action part is pretty much the same as before, only we’re setting the status & status reason to “Completed” this time:
Patch(Tasks,Self.Selected.Item, {statuscode:'Status Reason (Tasks)'.Completed,statecode:'Activity Status (Tasks)'.Completed})As for the command visibility, I want to check that A) there is only a single record selected and B) the status is not “Completed”. We’ll use the same workaround with “Percent Complete” field as before and include a CountRows function:
If(CountRows(Self.Selected.AllItems) = 1 && Self.Selected.Item.'Percent Complete' < 100, true, false)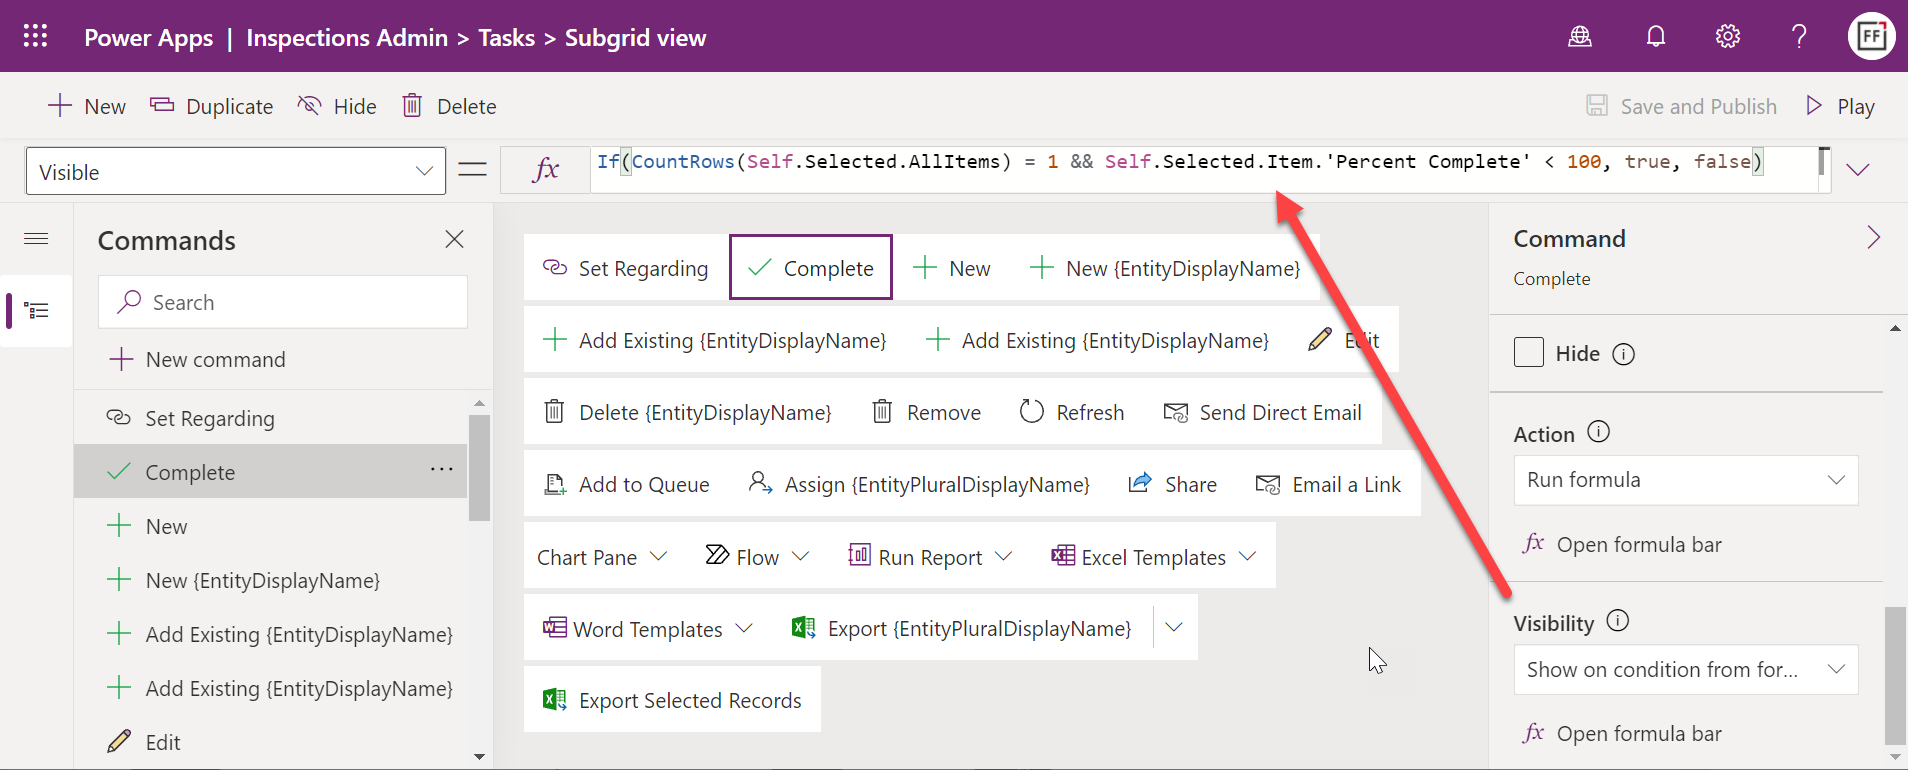
Now the command is ready for use in the subgrid. The visibility rule does work, although there seems to be a bit of a caching delay in determining the status of the chosen task. If immediately after closing a task as completed we go and select the same row again, the “Complete” button will still show there.
Although the clicking on a command will perform AutoSave, it is run before the command itself is initiated. After we perform a manual refresh of the form, the button is correctly hidden for the recently completed task. Just a minor detail you should be aware of when testing your custom commands.
The modern commanding feature looks very promising. If you have been using Power Fx in Canvas apps, building the action and visibility rules in the command designer isn’t that big of a leap. Sure, it is low-code rather than no-code, meaning we’ll need a larger number of documentation samples to understand how the properties and functions can be used in the context of an app command bar specifically. However, it’s a much safer sandbox for app makers to work in than full blown JavaScript, which one of the reasons it makes sense for Microsoft to invest in developing their programming language for low-code.
Ever since The Ribbon was introduced in 2011 (and later evolved into a Command Bar), I’ve always felt like it has been a missed opportunity for optimizing the user experience of business applications built on Power Platform / XRM. The barrier for modifying and extending it, even with awesome community tools like the Ribbon Workbench, has simply been too high for getting many of these nice-to-have features implemented in real life customer projects. The native command designer tool and common Power Fx logic can definitely help in lowering this barrier.
At the same time, we need to keep in mind that the modern commands don’t yet replace the classic commands from the RibbonXML era. Common requirements for usability improvement like hiding irrelevant default buttons isn’t yet supported. Check out Scott’s article on Ribbon Workbench vs. Power Fx Command Buttons to understand what is & isn’t available in Power Apps modern commanding.

Very nice article. Although intuitive as been using Ribbon workbench a lot. Good work and nice documentation.
Thank you for the effort
“In theory we should be able to accomplish this by adding a visibility formula for our custom command that reads:
Self.Selected.Item.’Activity Status’ = ‘Activity Status (Tasks)’.Completed”
Did you find any more regarding why this doesn’t work? This just cost me 2 hours until I stumbled across your blog post.
Serf, I believe it’s simply a bug/limitation in the current preview feature. Do also check out this blog post by Mats Necker where he describes how he got around this via using the Text() function to get the status / status reason field value as a string to reference in the visibility formula.
Thanks a lot, I was not aware of that blog post and a nice workaround 🙂
Let’s hope the limitations will be removed soon.
I am very hesitant right now to create new legacy buttons or HTML popups (vs Custom Pages) when there is something so much better on the way.
Cheers
Excellent walk-through, thank you for sharing!
As I see, in some formulas labels are used, e.g. when setting status reason. Does it work if a user changes the language?
Yes, the Power Fx code itself doesn’t directly reference the localized labels like the UI does. So, when writing a formula containing
'Status Reason (Tasks)'.Completedwe’re actually referencing the choice column value (option set field value in old XRM terminology), not a text string. The Intellisense in the editor should warn you if you’re accidentally trying to set the field value into a string, so in this sense it is “citizen safe”.This also works for Phone Calls?
Really good post. I have found the syntax has changed slightly: Patch( Tasks,Self.Selected.Item, {‘Activity Status’: ‘Activity Status (Tasks)’.Open, ‘Status Reason’: ‘Status Reason (Tasks)’.Open}) . Also I wanted to also patch the parent record ( Regarding) and looks like I can’t do that in the Formular bar.