Related sites:
Newsletter: Perspectives on Power Platform
Company: Niiranen Advisory Oy
In the previous articles (part 1 and part 2) we’ve explored how the North52 Formula Manager can be utilized in automating steps related to the sales process. This time we’ll be looking at a scenario related to service management, in an effort to make it easier to share knowledge and report on the resolutions of cases recorded in the Microsoft Dynamics CRM database.
 In theory it should be pretty straightforward how you work with a case record: they are support tickets that are initially open (active) when you create them and eventually they end up getting closed as either resolved (service was provided) or cancelled (duplicate ticket, customer never replied etc.).
The point where complexity raises its ugly head is how the resolution process works: instead of entering the case resolution details onto the case record itself, the user is presented with a window that creates a Case Resolution activity underneath the parent case. While this is a perfectly valid design in terms of the nature of the interactions, as there could be situations where the case gets re-opened and resolved again (thus being a 1:N relationship with the case), it does make it more complicated to work with the resolution data later on.
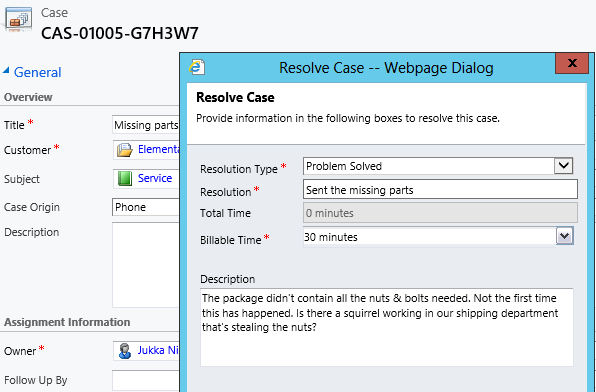
For example, say you’d want to study the resolved cases by using a view of the case records. In that view you can see the case subject, owner, status and other standard fields, but there’s no information visible on what the actual resolution to the case was. “Ok, so I’ll need to customize the view and show columns from a related record. That’s not too difficult, now is it?” Unfortunately that’s not going to work, because the information we’re interested in resides on the N side of the relationship. Since there can be several case resolutions for a single case, no columns from this entity can be displayed in a case view. So, we can’t construct a nice Q&A list that the service reps could leverage in scanning for similar cases on a new question from a customer. We can only see the problem, not the resolution.

You could build a view of case resolutions, the child entity in this relationship, but that’s not very convenient either. Although case resolution is an entity of its own, it’s not actually available in Advanced Find to directly build queries on. It is possible to access a list of case resolutions by crafting a view of activities with that specific type, but you’ll still be limited to only the generic activity fields. As an example, the field Billable Time (Time Spent) cannot be accessed in a view, which makes it rather difficult to report on this data entered as a part of the service process.

Luckily Dynamics CRM is a flexible platform that allows you to develop new business logic to fulfill the requirements for your service process. In this situation, if we could simply have the Resolve Case dialog fields copied over to the parent case, this would solve the aforementioned problems. So, how to proceed then?
If we want to alter the default behavior or the service entities, we should first have a look at the workflow process capabilities of Dynamics CRM to see if can configure a workflow rule that is triggered when the case resolution is created. This time we won’t get very far with that idea, though, as neither the case resolution nor the activity entity can be used as a workflow trigger. Fair enough, we’ll then need to come up with a lower level solution to meet this requirement. Assuming we have access to a .NET developer who knows the Dynamics CRM SDK, creating a custom plug-in to copy the fields to the case record would be a worthy option to consider. Since the title of this post promised “no-code customizations”, let’s instead look at how we could achieve the same functionality with the Formula Manager.
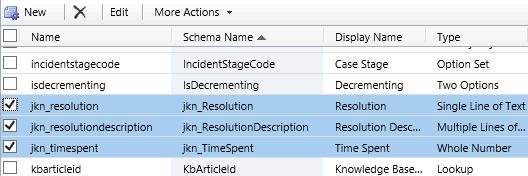
First we need a place to host the case resolution data of course, so let’s add three custom fields on the case entity: Resolution (text field), Resolution Description (multiple lines) and Time Spent (whole number with duration format). On the case form they can be put into a section of their own and set as disabled, since the user shouldn’t directly update them. Then we’ll create the three formulas that will populate these fields with corresponding values from the case resolution entity.
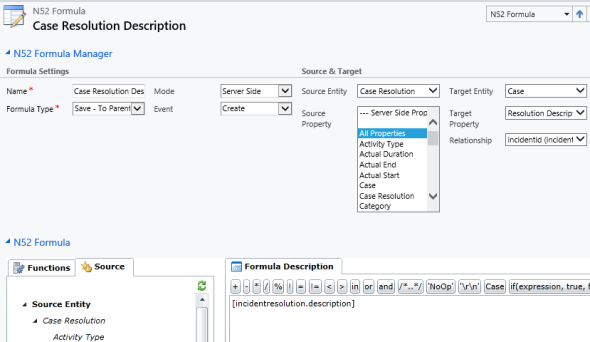
We’ll be using a formula of the type “Save – To Parent” and attach it to the create event of the case resolution entity. As our target (parent) entity we can select case, but notice that you’ll actually need to specify the relationship field value first before you’re able switch the value in the target entity field. Let’s take the Resolution Description field we just created as the target property. The formula itself in this case will be very simple, since all we need is a value directly from the source entity. We can use the source entity tree visible in the bottom left corner of the screen to browse through the available fields or just type in directly the value [incidentresolution.description].
The other two fields will get an identical treatment, which means we can click on the Clone Formula button on the ribbon and create two copies of the original formula. Just update the target property field and select a new source field value into the formula description window accordingly. After we’re done, we can publish the formulas and try them out by resolving an existing case.
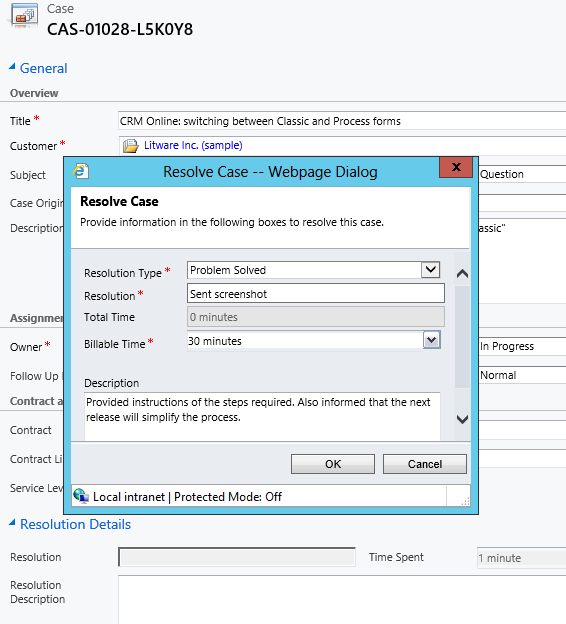
After we’ve entered the details into the Resolve Case dialog fields and clicked OK, our formula will update the underlying case form in real time to reflect the same values presented directly on the resolved case record. Unlike asynchronous workflow processes, the formulas can perform their tasks right in front of the user, which makes the user experience more consistent.
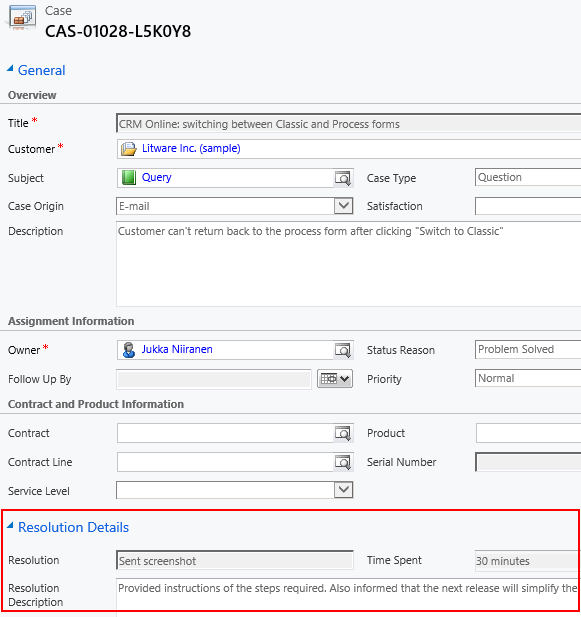
Now that the fields are available on the case entity, we still need to ensure that the user actually has access to them through all the necessary routes. First we should of course include them into the Resolved Cases view we talked about earlier.

Seeing the resolution field contents directly in the view is a great improvement, but an even more important feature is to enable the users to search for this information. You see, one of the peculiar default settings of Dynamics CRM is that the Quick Find view for case entities only covers active (open) cases.
In order to make it possible to search for closed (resolved) cases, we’ll need to remove the existing filter from the status field from the Quick Find Active Cases View by clicking on “Edit Filter Criteria”. After this we should proceed to “Add View Columns” and “Add Find Columns” to include the new Resolution and Resolution Description fields into the view.
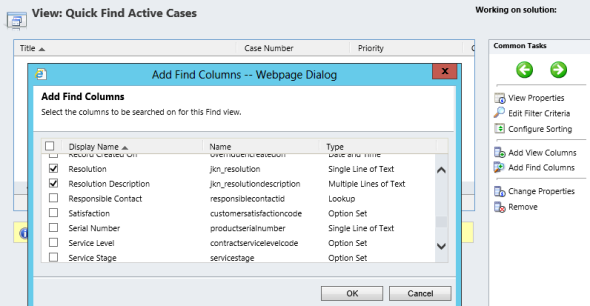
Now we’re all set for performing searches on the past cases based on either the question or the answer. I bet your customer service reps will start to see CRM as a much better tool for supporting their tasks as a result of these configuration changes.
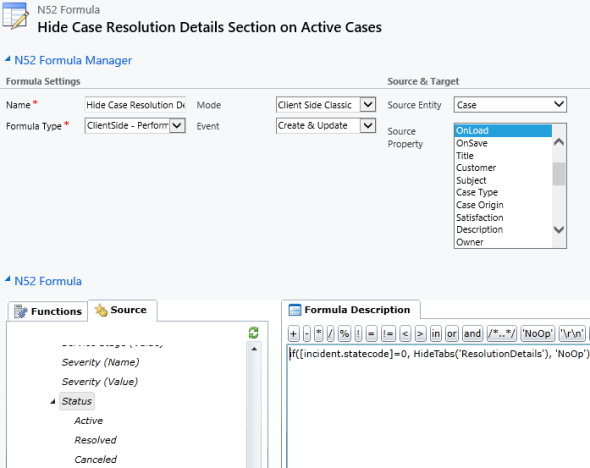
As a finishing touch, we can make adjustments to the presentation of the case resolution fields on the case form by adding one more formula. Although the fields are already set as “read only”, there’s actually no need to show them at all on the form if the case is still active. To streamline the form we’ll add one more formula, this time on the case entity. Instead of updating the record, we’ll choose a “ClientSide – Perform Action” type of formula to be triggered on the case entity’s form OnLoad event. The HideTabs function allows us to dynamically display the ResolutionDetails tab on the case form based on the case status, so we’ll enter the following statement into the formula description: if([incident.statecode]=0, HideTabs(‘ResolutionDetails’), ‘NoOp’).
That’s it, we’re now ready! Well, if you think about it, there are of course more potential tweaks to be made to the service process with the help of Formula Manager: supporting case re-opens by summing up the Time Spent values, concatenating Resolution Description field values etc. The great thing about working with formulas instead of plugin code is that you can update the business logic directly within the CRM user interface, thus greatly reducing the time needed for implementing changes or adding new functionality.
Like I’ve mentioned in the previous articles of this series, the Standard Edition of Formula Manager gives you 10 free formulas to work with, so there’s plenty of room to try out the different features in addition to the four formulas created in this example for managing case resolution information.
Hi
I am doing calculations with n52 for salesorder in crm2011.
First I calculate tax for order product from tax percentage and then it goes well to the order form when I press recalculate in salesorder, works nice.
Then I want to subtract a value which is located to order product form from salesorder. That works also very well.
Both formulas work nice individually. But when both are activated at the same time, only the subtraction formula works.
Tax formula uses save – to current record and subtraction uses save – to parent.
Do you have any idea why those two will not work together? I assume the problem is related to event pipeline…
I haven’t come across such concurrency issues myself. Have you tried turning on the trace feature on the forumla to collect some log data on the error? When experimenting with different kinds of formulas and trying to find the right methods to implement the business logic I wanted, I found the error messages from Formula Manager quite useful, even though I’m not a .NET developer who should understand the details of those.
If you can’t locate the source of the error, I’d encourage you to send a message through the Formula Manager support site. North52 have received some great feedback on being able to swiftly deal with customer enquiries, so I’d expect them to be able to help you out in discovering the cause of the error.
Thanks, I have to check the trace.
[…] North52 Business Process Activities (formerly known as Formula Manager) can be used for building a no-code customization to better leverage case resolution data. This of course will not cover any records created prior to deploying the customization, so […]