Related sites:
Newsletter: Perspectives on Power Platform
Company: Niiranen Advisory Oy

 One of the most common customizations almost any organization working with customers from multiple countries will want to have in their Microsoft Dynamics CRM data model is the addition of a structured list of country names, to ensure they are stored in a consistent format. Yes, by default the Country/Region fields on the account, contact and lead entities are free text fields that a user must manually fill every time. This can result in some serious issues with data quality that make it difficult to perform a common task such as searching for accounts from specific countries. The field may contain values like “United States of America”, “United States”, “USA”, “Estados Unidos de América”, not to mention different conventions for upper/lowercase letters, hyphens etc.
Why doesn’t Dynamics CRM come with a pre-configured list of countries? There are probably several reasons for the choice of this design, some of them which date back to the early days when CRM wasn’t a multi-language platform (before version 4.0 came along). Anyway, there’s absolutely nothing stopping us from fixing this gap by using the basic customization tools, so let’s get right to it!
There are two alternative approaches to implementing a controlled list of values for country names. You can either create a new option set (preferably a global one) or a new entity to hold the country name values. There are pros and cons to each method, which means the right choice depends on the use cases of the organization in question. In a simple scenario the option set may well be sufficient, if there are no other requirements for country data in CRM. For implementation guidance, look no further than this excellent post by Pedro Innecco: Dynamics CRM: Adding a Country/Region option set using ISO 3166-1.
Sometimes the country data management requirements may be somewhat more complex, which may lead you into choosing to create a custom Country entity. This approach has the benefit of allowing you to store other variables than just the name of the country on the same record. For example, there may be parameters related to reporting that are country specific and would therefore be logically placed on the same record as the official name of the country. Other regional variables such as states or languages spoken are also a natural fit to be stored on the country entity.
One interesting scenario to explore is the possibility of using the Country records as a central location for posting updates specific to a particular region, by using Activity Feeds on the Country record’s wall. Let’s say you have a multi-region Dynamics CRM implementation and you want to target auto-posts to users working with customers from specific countries. By generating posts like “New campaign Big Fair 2012 launched in @Finland” or “Major opportunity closed in @Sweden for account Contoso” that mention the country record you can easily push updates to any user who’s following that particular country. For a more detailed explanation please see my earlier post on how to make CRM Activity Feeds easier to follow by creating custom groups.
There’s a catch with the custom entity approach, though, and that is the lack of native support for multiple languages. While the option set labels are a part of Dynamics CRM solution files and support translations just like your regular form fields, a custom entity is just data stored into the CRM database, no matter if you use it in a metadata like manner. As a result, if your CRM organization has different languages enabled and the user switches from English to Spanish, the value on the Country field on the account form won’t change from “United States of America” to “Estados Unidos de América”. If you had used an option set, all you’d need to do is export the labels for translation, enter values for the Spanish language column for the option set values, import it back and publish the results. However, with the custom Country entity we’ve ended up choosing, the value stored in the name field of the Country record will display the same way, regardless of the UI language of the logged in user.
Lucky for us, Pedro has come up with a solution that can also handle the multi-language support requirement when using a custom entity to hold the country labels. In the image below, you can see an account record viewed first in English, then in Finnish. Even though we’re using a lookup field to the Country entity on the account form, the label of the selected Country record has magically been translated from one language to another. As if that wasn’t enough, also the Look Up Record dialog window shows a list of values that has been tailored to the language of the user. Well, that looks like the best of both worlds, doesn’t it?
How can you switch the label in the lookup field then? All you need to do is to download the Country/Region for Dynamics CRM solution created by Pedro Innecco and configure your CRM organization to take advantage of the scripts included. The solution also provides the ability to add more languages, so I’ll list out the steps I followed to add the Finnish language support for this Country lookup field.
The steps we’ll go through are on a high level the following:
After you’ve downloaded the zip file, extract the contents onto your hard drive. You’ll find the CRM solution zip file in there, which you can proceed to import into your CRM. Please note that this is an unmanaged solution file as it needs to support the customization needed for enabling new languages. After you’re done, you might want to open up the new Country entity in the solution and set that to be displayed in the Settings area, so that you can easily navigate to the list of countries without needing to use Advanced Find every time.

Next we’ll open up the Country entity form. As you can see from the list of available attributes in the Field Explorer, the solution actually has readymade fields for a whole bunch of languages. This is because the fields should use the specific Microsoft Locale ID’s (LCID) in their names for the scripts to work. Go ahead and add the fields you need onto the form and remove any languages you don’t need to support.
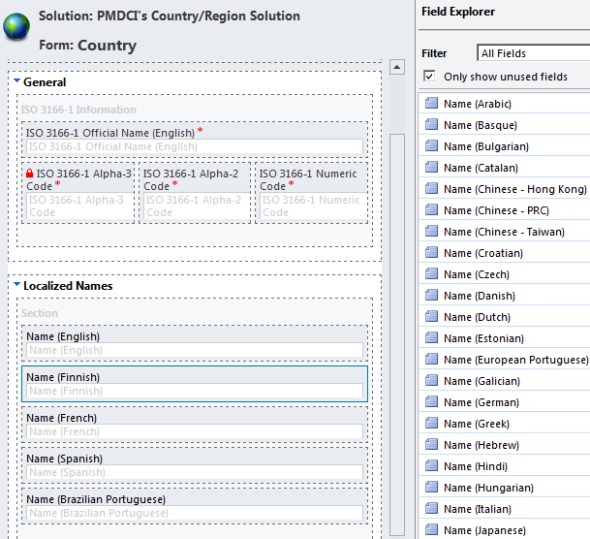
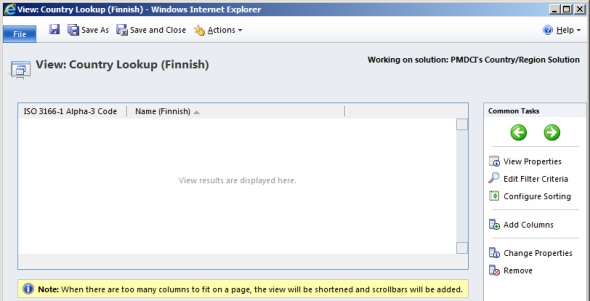
You’ll need to create the lookup views for each additional language you want to support. Just open up the Country Lookup (English) view, save a copy of it with the right title (I’ll use Country Lookup (Finnish), but these could be localized, too). Replace the name field with the correct language version, set it as the sorting field and save your changes. Before closing this dialog, click Ctrl+N to open the form in a new window. Copy the URL from the address bar that’s now visible. This URL contains the GUID of the new view which you’ll need later on.
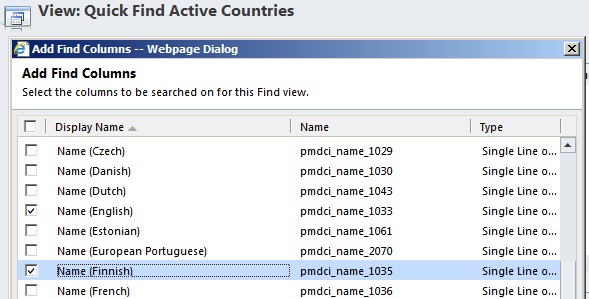
In order to enable the user to search for the localized country label values, we must add them as search fields in the Quick Find view of the Country entity. Open the Quick Find Active Countries view, click Add Find Columns and enable/disable the fields as needed.
Next we’ll move over to the business entities where we want to use the country values. I’ll cover only the account entity here, but the same steps apply to leads and contacts as well.
First, remove/hide the default Country/Region field and add the new_countryid field (or whichever is the relationship attribute that connects accounts to countries) in its place.
Open the Form Properties dialog, expand the Form Libraries section and add two web resources to it: pmdci_FetchCountryName and pmdci_SetCountryLookup.
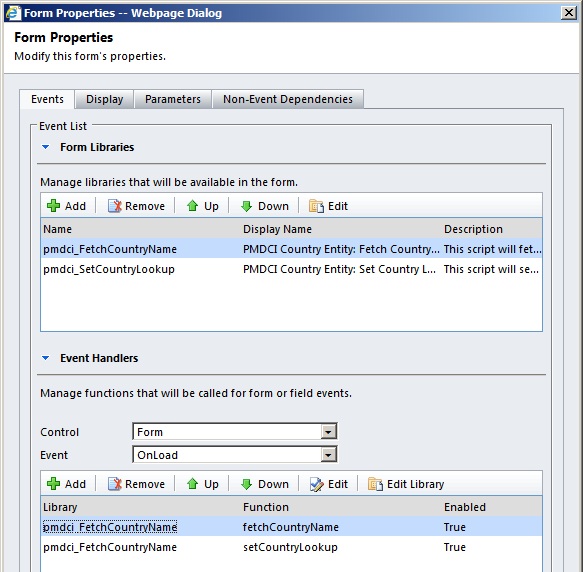
For the form OnLoad event we’ll need to add two functions: fetchCountryName from pmdci_FetchCountryName and setCountryLookup from pmdci_SetCountryLookup. The handler properties below apply to both of them, with the exception that in setCountryLookup you should add two parameters: “new_countryid”, 1. (The web resources contain more instructions on using the parameters.)
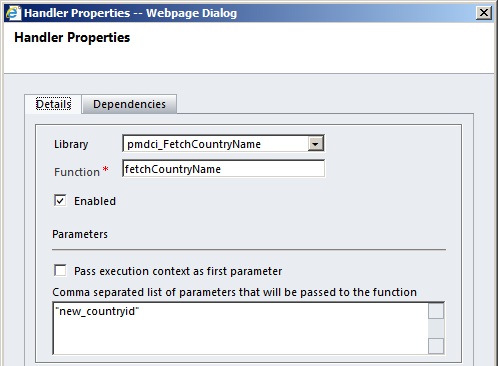
For the form OnSave event we’ll add the submitCountryName function from pmdci_FetchCountryName with the “new_countryid” parameter. You can now save and close the Form Properties dialog.
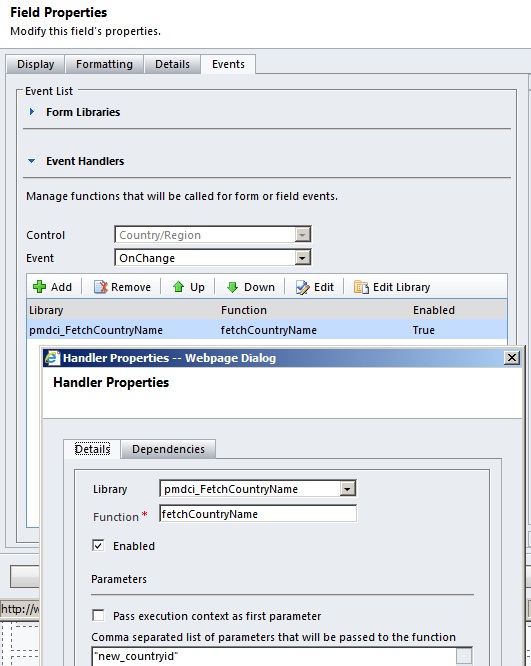
Next, open the Field Properties for the custom Country field you’ve added onto the form. Using the same pmdci_FetchCountryName library, add an OnChange event for fetchCountryName.
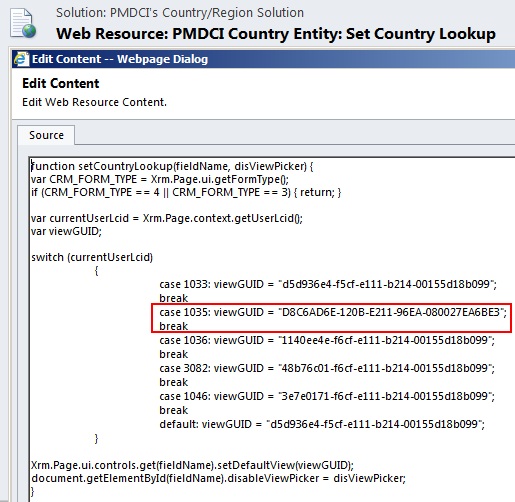
Remember that view GUID value we copied previously? We’ll need to add that into the script that will choose the correct lookup view to present to the user based on his or her language settings. Open up the pmdci_SetCountryLookup web resource, copy one of the existing case rows in the script and paste it in. Change the language code to the one you’re using (in my example it’s 1035 for Finnish) and replace the GUID with the one you’ve picked up from the form URL earlier on. It’s the last GUID string in the URL, but beware of extra characters like %7b at the start and %7d in the end.
Are you still with me? Good, because we’ve got an important step still remaining: the actual data. Pedro has been kind enough to provide us a list of country names and corresponding ISO codes as a part of his zip file. You can open the CSV file in Excel and add new columns for all the languages you need to enable. I took the Finnish country names from Tilastokeskus (Statistics Finland), matched them with the ISO 3166-1 Alpha-3 Code column and saved them as a new CSV file (you can download it from here).
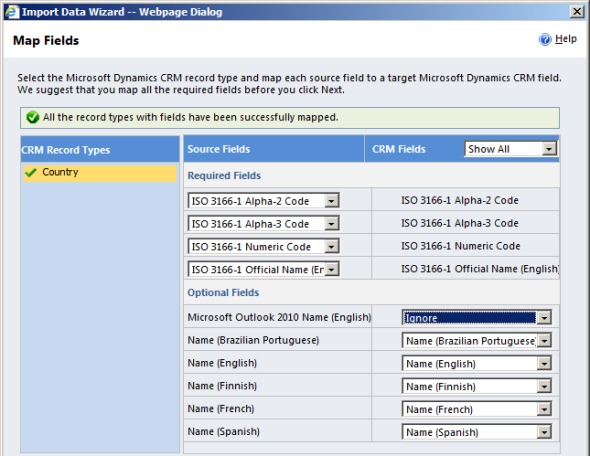
Start the Data Import Wizard, select the CSV file as a source, map it to the Country entity and make sure the fields are matching.
After the import is done, you should be ready to go and populate an account record with the value from the custom entity. If everything is configured correctly, clicking on the lookup field will present you with a list of values that is in the language of your user account. Save the record, change your language, come back again to the form and see the scripts work their magic.
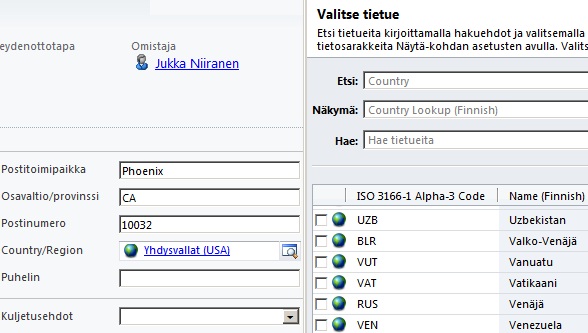
Don’t forget to add the mappings between entities for the new custom Country field, so that a lead form’s value will get carried over to accounts and further down to contacts. Also, it might be a good idea to populate the default Country/Region text field value with the name of the selected country record through a workflow, although you’ll need to choose a default language to use in this static field.
What the Country/Region solution from Pedro Innecco delivers is a creative way to overcome some of the limitations with the usage of a custom entity to hold the country data. The same scripts could surely be adapted to cover also other scenarios where the lookup field value needs to be translated on the fly, thus enabling us to have the best of both worlds: rich data that adapts to the multi-language CRM environment.
You should note that the scripts included in the solution only translate the lookup field and the lookup dialog view. If you’re using the country fields in any standard views on a CRM data grid, you’ll either need to have these targeted towards specific user groups through sharing personalized views to groups rather than using system views common to all, or alternatively develop your own plugin for performing the translation also when a user opens the views.
In this day & age of mobile computing it is important to remember that the scripts used here will work when the user is accessing CRM forms either through the browser or the Outlook client. Using a mobile device will not allow such manipulation of the presented data, so make sure that whatever customizations you perform by changing the lookup field value are something these mobile users can do with out. The same of course applies to any form scripts with the mobile clients we have available today. How will the world change once the “Windows 8 Style” client app (formerly known as Metro CRM) becomes available this winter is something worth keeping an eye on, as is the new “Refresh UI” that aims to simplify the classic browser client experience. Oh, and don’t forget that cross-browser support is also coming up, even though it was delayed, so testing the functionality of any form scripts you deploy into your Dynamics CRM environment is becoming more and more crucial.
Finally, since we’ve been discussing the topic of address management here, anyone who intends to customize the data model around this fields should definitely read about the importance of the address entity before proceeding any further with designing their solution.
Great post Jukka! I couldn’t have explained it better myself. 🙂
Some people might be wondering why I added the Outlook 2010 names in the CSV file. The reason is that I had to once create a solution that would consider the integration between CRM and Outlook., so the Country entity also had a field to hold the reated name for the countries/regions in Outlook 2010. The solution was far from perfect, due to what I perceive is a mix of poor design and not thinking outside the box. First, the country list in Outlook 2010 makes no sense. There are some entries in the list that shouldn’t be there, and it is also missing some important entries. Second the default control used for the contact country field in Outlook is a combo box (the one that combines a text box and a drop-down menu). Therefore users can type anything they want in those fields, which would potentially mess any sort of integration with CRM (and don’t even get me started with different outlook versions and languages!). I know that I could customise the Contact form in Outlook so I could potentially replace the country control with another one, but there are some sort of business logic around addresses which could be broken if the solution isn’t properly designed. So in the end the customer wasn’t willing to pay for the additional R&D for a bullet-proof solution, so I we had to compromise on the features. But I ended up leaving the column for Outlook names in the file in case somebody is willing to dig up further into the subject 🙂
Kiitos!
P.
Hi’ this is not the place to ask but i have this problem :
https://community.dynamics.com/product/crm/f/117/p/93412/176474.aspx
Would appreciate any pointers!!
br
irfan
Sorry, Irfan. I haven’t come across such an issue with label translation import/export process before.
Hey Jukka,
great post! Do you think it will be possible to get the “connection roles” to multilanguage in the same way?
Jobengaru, the problem with Connection Roles is that the entity does not support adding custom fields. With a custom entity like “Country” the data model is flexible an allows this kind of translation through script, but since Connection Role is much more restricted and doesn’t even allow adding new relationships (like a child entity for storing language variations of the label), the code required for pulling the label from somewhere else in the CRM database would likely be quite complex. Also keep in mind that the subgrids and related views for Connections would still show the original label, unless you execute an additional plugin that modifies the view contents.
If you need to support multiple languages, I would recommend avoiding the default Connections feature and create a custom entity instead. While there is some nice functionality in Connections, in practice working with them can be troublesome, and not only due to the lack of multi-language support. Connections are great for ad-hoc entry of data that doesn’t have a specific place in your CRM data model, but for capturing structured data it is often easier to build a dedicated custom entity for this purpose.
Thanks to you and Pedro for helping fill this gap in CRM functionality. It appears that using the method of using a new Country entity will not work to add a Country lookup field to the Address (More Addresses) form since the Address (customeraddress) entity does not allow custom relationships to other entities. Do you know of a way to accomplish adding a Country lookup field to the Address form?
In reply to Andy’s question above, this is a limitation that really annoys many CRM users. I have already flagged this to Microsoft on the Microsoft Connect site, and yet they seem completely oblivious.
The only solution would be to add a drop-down to the Address entity…