Related sites:
Newsletter: Perspectives on Power Platform
Company: Niiranen Advisory Oy
 North52 Formula Manager is a very interesting solution that promises to simplify the process of customizing and extending Dynamics CRM by offering a graphical toolkit to implement custom business logic that would otherwise require developing plug-ins in C# or adding Javascripts on the forms. Instead of writing custom code, the business logic can be configured through the N52 entities inside CRM, with the help of a Silverlight based editor to write formulas that check conditions, perform validations, update fields etc.
In this article I’ll show you a few simple examples of how a person with no coding skills can perform some customizations that go beyond the GUI tools that Dynamics CRM offers. I’ll use the opportunity entity to add some client side actions to make the sales process a more guided experience for the end user. You can grab the free Standard edition of Formula Manager and use it’s 10 available formulas to try out these examples in your own CRM environment, or watch some of the training videos from North52 that cover several other scenarios.
The sales records in Dynamics CRM contain a few fields that sometimes don’t deliver any added value to the user, but they still need to be filled for each record. One common example is the usage of the price list. If your organization only has a single valid price list at any given time, the CRM users would surely appreciate it if the system could automatically populate the lookup field with the default price list when creating a new opportunity.

This is a very simple formula where all we basically need to do is populate a lookup field with a static value. To get the GUID of the price list, open it’s form in a new IE window by pressing Ctrl+N and find the string like “3F2504E0-4F89-11D3-9A0C-0305E82C3301” from it. Then create a new N52 Formula record and define the formula type as Save – To Current Record. We’ll set the mode as Client Side Classic and set it to run on the Create event, as we want the price list field to be populated with the default value only once – when the user creates a new opportunity record. The source and target entities should both be set to opportunity, as we’re updating the current record. The source property in this case is the event that triggers the formula, so let’s select OnLoad to fill the field immediately when the form is opened. Finally, the target property should be the field that will be updated with the results of the formula, in this case Price List.
Different field types on the CRM form require different kinds of update procedures. Since we’re dealing with a lookup field and populating it as a client side event, let’s pick the SetClientSideLookup function from the N52 Formula menu and give it the required parameters of the entity name, record GUID and record display name:
SetClientSideLookup(‘pricelevel’, ‘5EF541AA-67B6-E211-93F7-08002719F2F4’, ‘Default List’)
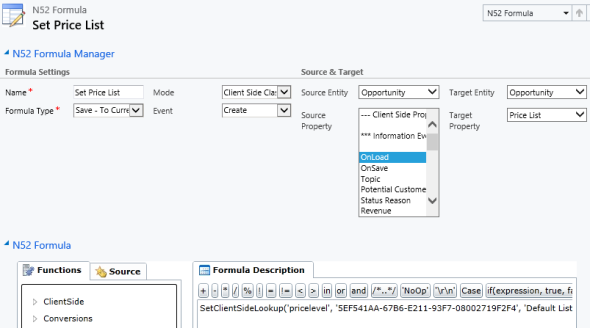
Now we’ll just need to publish the formula and go test it out by creating a new opportunity record and verifying that the price list gets set to the record we wanted. In case you get an error prompt from N52 Formula Manager while opening the form, please revisit the formula record and verify that you’ve selected the correct options.
Changing the requirement level of a field based on another field on the form is another common requirement. Let’s assume we have a simple sales process with three stages (picked up from the default CRM sample opportunity data): 1) Prospect, 2) Qualify, 3) Closing. We’ll use the Status Reason field’s (customized) values to drive the process and we want to enforce the following business rules:
In the UI the user would see the requirement level change dynamically when he or she changes the Status Reason field value and clicks elsewhere or tabs out of it.
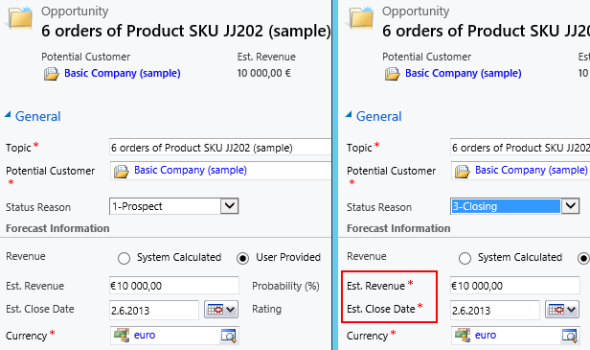
To achieve this feature with Formula Manager, we would build a formula that references the statuscode ID values and the schema names of the fields we want to set as required. Something like the following if-statements:
if(([opportunity.statuscode]=’2′), SetRequiredFields(‘estimatedvalue’), if(([opportunity.statuscode]=’3′), SetRequiredFields(‘estimatedvalue’, ‘estimatedclosedate’), SetNotRequiredFields(‘estimatedvalue’, ‘estimatedclosedate’)))
Basically what we do in the formula is first check for the stage 2, then stage 3 and finally use a default action for stage 1 to return the fields into not required status (so we also support moving backward in the stages). We’ll set the formula to run on the opportunity entity as a Client Side – Perform Action formula, tied to the source property of the Status Reason field, which effectively means it’s triggered with the OnChange event of that field as the user manipulates the form values.
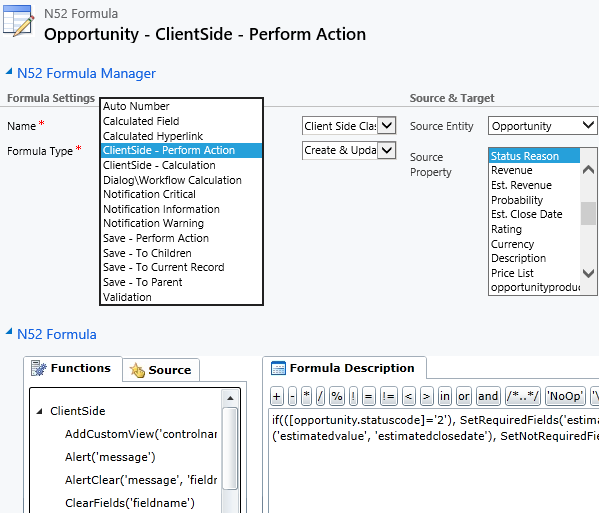
Publish the formula, then go and update your opportunity Status Reason values. You should now see the red asterisks appear and disappear based on the selected stage.
When dealing with records like opportunities that involve forecasting future events, it’s not uncommon that their field values will later need to be updated to reflect the current status. For example, the estimated close date of an opportunity may have expired while the opportunity still remains open in the sales pipeline. You can of course send out workflow based email notifications to the owner of the opportunity and request them to update the records, but wouldn’t it be nice to also display some kind of notifications right inside the CRM user interface? Like this:
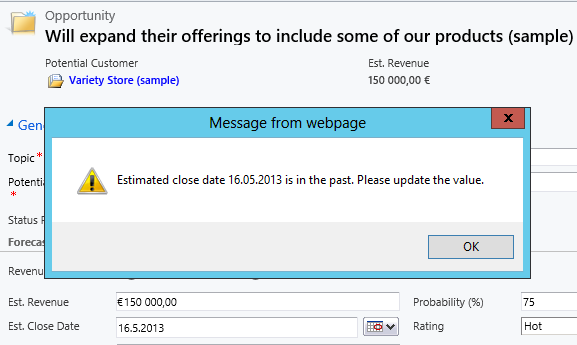
Let’s create another Client Side – Perform Action type of formula for the opportunity entity and attach it to the OnLoad event of the entity form. In the formula itself we’ll compared the estimated close date to the current date and pop up an alert if it’s in the past. Notice that the data from CRM will be in UTC, so we’ll want to pick up the appropriate functions from the N52 Formula menu to convert the output of the alert back to local time.
if(ContainsData([opportunity.estimatedclosedate]), (if([opportunity.estimatedclosedate] < UtcDate(), Alert(‘Estimated close date ‘ + ToString(LocalTimeFromUtcTime([opportunity.estimatedclosedate]), ‘dd.MM.yyyy’) + ‘ is in the past. Please update the value.’), ‘NoOp’)), ‘NoOp’)
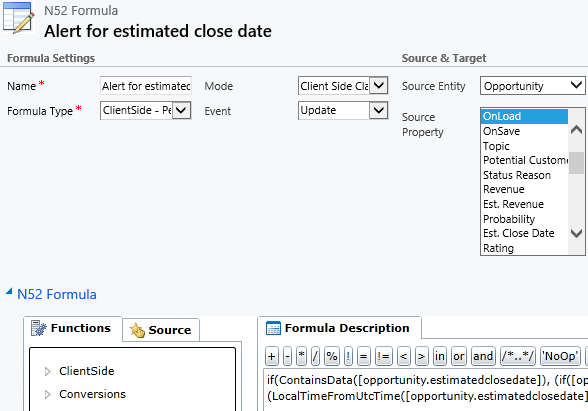
Publish the formula and go enter an expired estimated close date on an opportunity record. Once you save it and the form reloads, you should get a prompt that informs you about the need to set a new date.
Alerts can be useful, but what if we wanted to display a more interactive prompt to the user that allows data input? Luckily Dynamics CRM 2011 has just the feature you’re looking for, called dialogs. However, launching a dialog is by default an action that the user needs to consciously perform. The available dialogs are hidden behind a default ribbon button that doesn’t exactly scream “click me!”, so many users may never explore the options behind it. We could build a custom ribbon button for the dialog by using a tool like Ribbon Workbench by Scott Durow, but even that still leaves it up to the user to trigger the process.
With the help of Formula Manager, we can easily define a rule that launches a dialog process window when a certain criteria is met. In this example, let’s assume that we have a dialog process called “Opportunity scoring” that asks a series of questions from the user and based on the answers calculates a score value that it then stores in a custom integer field on the opportunity, called new_score. If the score field is empty for an opportunity record that the user opens, we want to present the dialog window to them in order to capture the answers to the questions and determine the opportunity score. They are of course free to close down the popup window, but it will haunt them every time they visit the opportunity, until there is a score value recorded on the opportunity.
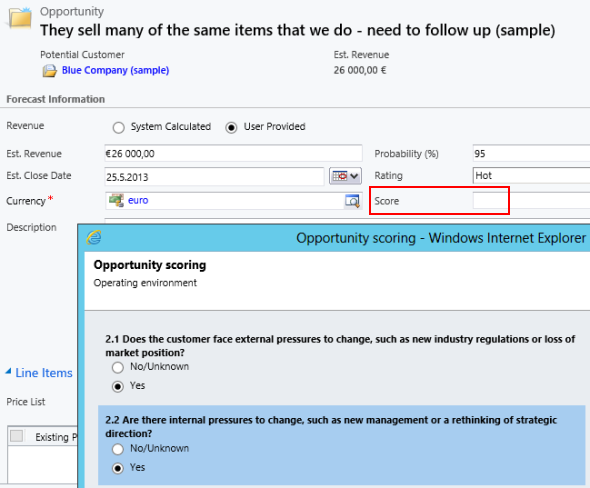
To achieve the aforementioned functionality, we’ll build one more Client Side – Perform Action formula for the Update event of the opportunity and launch it on the form’s OnLoad event. The formula checks if the field new_score is empty and then calls the ExecuteDialog function to launch the Opportunity scoring dialog:
if(DoesNotContainData([opportunity.new_score]), ExecuteDialog(‘Opportunity scoring’), ‘NoOp’)

Once the user completes the dialog, its final step will update the value to the new_score field, which in turn will stop the formula from prompting the dialog window after the user saves or opens the opportunity record. If this scoring was a recurring process that would need to be repeated every X days, we could of course also store the date of the score update on the record and then reference that in the formula, to see if the score needs to be refreshed.
The examples shown above are not exactly rocket science when it comes to extending the Dynamics CRM application functionality. You can find several JavaScript examples from the web that will allow you to achieve the same results by placing scripts directly on the entity form’s properties, without installing any additional solutions into your system. So, why would we not just copy & paste those scripts into CRM as before?
The benefit of a product like Formula Manager isn’t really in delivering any single Dynamics CRM extensibility feature but rather in the configurable layer that it offers for managing the custom business logic required by your specific business processes. After you implement a basic function like setting a default price list, you’ve got all the tools available to expand the formula and include additional business logic, such as the selection of a customer specific price list based on a set of rules. Furthermore, the logic will not be hidden inside a plug-in’s code but rather visible directly in the CRM UI, ready for the modifications that may be required as business processes change. To some extent, it’s like the difference of a workflow vs. plug-in: they are accessible to a much larger audience, which lowers the barrier of leveraging them to solve business problems in creative ways, thus potentially leading to a higher utilization of the CRM platform capabilities.
A powerful toolkit like Formula Manager does require its user to have a fairly detailed understanding of how the Dynamics CRM platform works and what are the extension methods that it offers. If you’ve only just gotten familiar with how to add fields, update forms and create custom entities through CRM’s own customization menus, then Formula Manager will most likely require you to study a bit more about the different event and field types that the formulas will be attached to. Formula Manager offers you a set of functions, some of which are specific to Dynamics CRM’s way of doing things, whereas those used for string manipulation, mathematical equations or logical conditions are generic in nature. Before jumping into formulas, I also suggest you also familiarize yourself with the out-of-the-box capabilities of workflow processes, as these can already deliver much of the business logic customization features that a typical Dynamics CRM implementation requires.
As mentioned, the Standard Edition of Formula Manager is free to download and use in any environment (test or production) for 10 formulas, with no other functional limitations. That should give you plenty of room to explore the features and see if they can help you configure your business rules in a more efficient manner than the traditional custom code development approach would offer. I myself will certainly keep digging deeper into the features of Formula Manager and report back with other examples of common scenarios that could be addressed with a no-code solution by using formulas instead.
Also check out Part 2 of the series where we use Formula Manager to update, create and even clone sales record line items.
[…] a previous post I wrote about how the North52 Formula Manager solution can help you build some common […]